You probably know by now that wine is my drink of choice on most occasions. And where there is wine, there is charcuterie! Charcuterie Boards are popular right now, but they have been a staple in the Cox household for years. It is our go to snack from afternoon wine tastings, to an appetizer when entertaining guests, to even dinner for just the two of us! We eat charcuterie boards so often that I’m usually fully-stocked when it comes to cheeses, meats, and crackers, which is a plus when we have friends stop by! With warmer weather on the way, I wanted to share how I build and assemble my go-to charcuterie board!
Any great spread starts with a great serving board, and finding one isn’t too hard nowadays – you can find decent ones from Marshalls to Target to Crate & Barrel to Amazon! I have a few and rotate through them depending on how big of a spread I’m preparing. I’m currently hooked on this one for trips to the winery or more realistically, the kitchen island.
From there, you want to choose the main event – your cheeses, meats, and crackers. Depending on the season, I like to switch up some of the items I use, like fruits and spreads, but for the most part, my cheese and meat selection stays relatively the same.

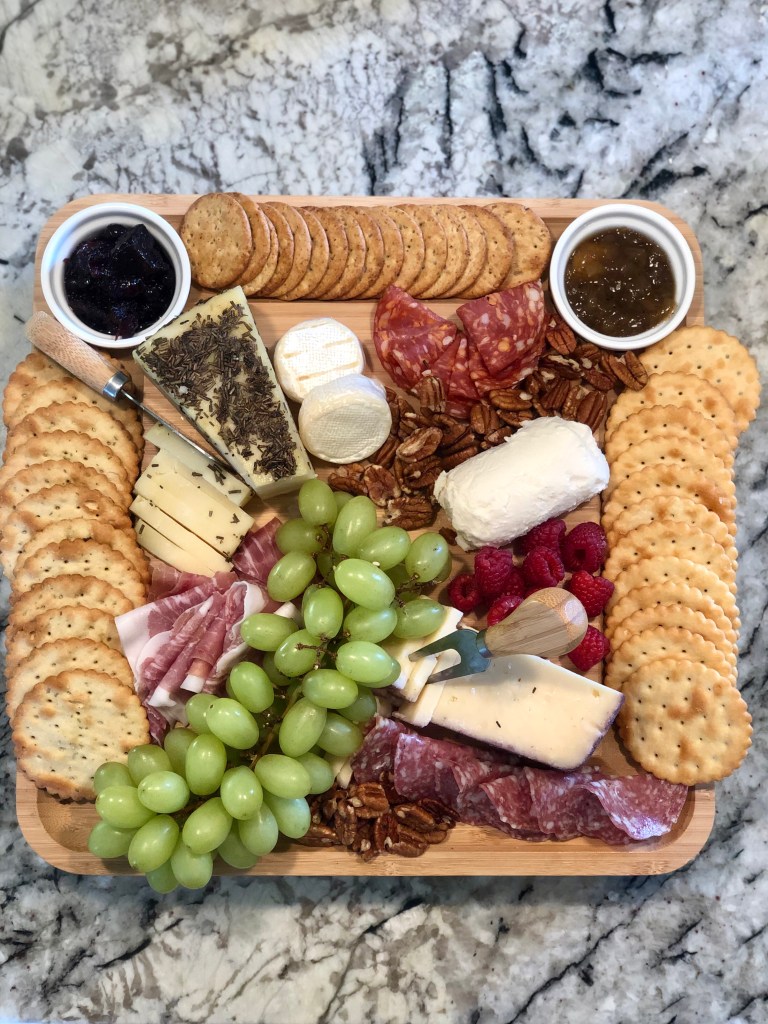

Ingredients:
- 2-3 Hard Cheeses – My favorites are Rosemary Asiago, Syrah Soaked Toscano Cheese from Trader Joe’s, and Whiskey Infused BellaVitano
- 1-2 Soft Cheese – I used Brie Bites from Trader Joes’ and Goat Cheese
- 2-3 Meats – Prosciutto, Salami, and Summer Sausage are my go-to’s
- Variety of Crackers – Rosemary Taste of Inspiration crackers are my favorite!
- Honey or Jam for spreading
- Fruit – I typically go with what’s in season. Blackberries and grapes are my current favorite!
- Nuts
Assembling:
- Start with the big items first – hard cheeses and crackers. I try to place them on separate corners of the board so that all can reach at least one cheese from no matter where they are standing. Sometimes I go ahead and cut a few slices off of the block so it is ready to serve. I arrange the crackers similarly, often boarding the cheese or the edge of the board.
- Next comes the meat. I like to place the meat near what cheese it pairs best with. For example, my Asiago and Prosciutto go so well together, so I always put them near each other. I also like to fold my bigger salami and prosciutto pieces to make them more visually appealing.
- I typically will now add the soft cheese where there’s room on the board. Since it is typically smaller than the other cheeses, it is easier to find space – just keep in mind this cheese is harder to make nice and neat slices so don’t put it near something you don’t want it to touch!
- Add your condiments. I typically use ramekins to hold the fruit preserves, jam, or honey and leave them on the outer-edges of the board. You don’t want to accidentally drizzle honey on your entire spread!
- Lastly, fill in the empty spaces on the board with your fruits and nuts. You can even add fresh herbs for styling!
And that’s it! I love how they fancy up any occasion with minimal effort, especially when it comes to entertaining guests. Plus, they are so customizable that allow an amazing selection of different bites that work with anyone’s food preferences. Besides, there are few things better than a little cheese and a little wine!
